SWC 2a: ePortfolios: The Technological Basics
Dynamic PDF: ePortfolios: The Technological Basics
Creating an ePortfolio combines two different aspects—a writing aspect and a technological aspect—into a single project. This handout focuses on ePortfolio’s technological aspect. First, here is the definition of an ePortfolio:
An ePortfolio is a curated collection of “artifacts” (written projects, pictures, video and audio files, etc.) that document educational or professional development and are assembled into a digital presentation.
A completed ePortfolio looks much like a website and may include a wide variety of items or “artifacts.” What follows is a simple step-by-step guide to using the ePortfolio dashboard in D2L and creating an ePortfolio.
Creating your ePortfolio
- Begin by logging into your ePortfolio Dashboard. The Dashboard is the “home feed” for your ePortfolio account and is where you can access all of your artifacts and presentations. To reach the Dashboard, sign in to your D2L account and click on the ePortfolio button on the second row menu.
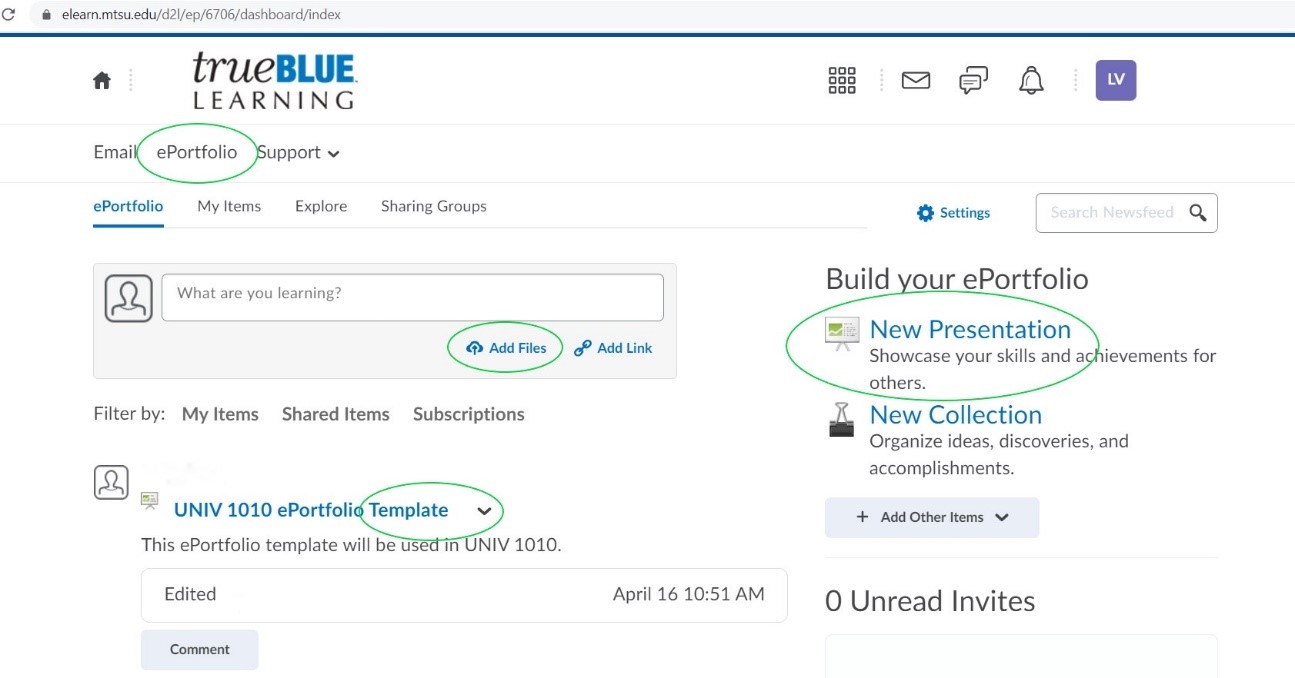
- Next, upload any elements or Artifacts you wish to include in your ePortfolio. Click on the Add Files button located under the main textbox on the Dashboard. You don’t have to upload all of your artifacts before beginning to design your presentation, but you will not be able to add a file to your ePortfolio until you first upload it through this option. Be sure to upload one file at a time – uploading more than one at the same time will “lock” those files together, and you will not be able to separate them later.
- Note: ePortfolios can be created using either the Template or Non-Template
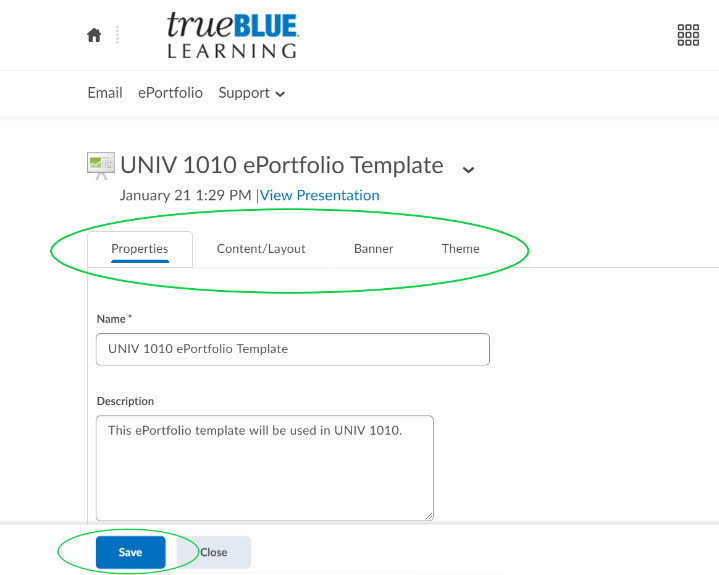
- Template: Many professors ask their students to create ePortfolios using a specific template, which they send to their students through the Dashboard. In this case, you will begin your ePortfolio by finding the template, clicking on the tiny arrow next to the template’s title, and selecting “edit.” A template comes with the necessary pages built-in; your main task will be adding content to each page.
- Non-Template. Some professors do not require that you use a specific template. In this case, you will create your ePortfolio by clicking on the New Presentation button on the right-hand side of the dashboard. ePortfolios are called Presentations on the Dashboard. You will be taken to the Properties page where you can name your Presentation file (this is not the name that will appear on the header of your ePortfolio).
- Next, use the Content/Layout page to add new pages to your Presentation, arrange elements on each page, and add text or artifacts using the Add Components button. The Banner page allows you to edit the header and tagline at the top of your Presentation, and the Theme page allows you to choose your Presentation’s design from over forty thematic options.
- Be sure to click Save at the bottom of your screen to save all changes.
This Presentation will now appear on your ePortfolio dashboard. To resume editing it, click on the tiny arrow next to the Presentation’s title and select Edit.
More ePortfolio Resources
An ePortfolio Guide is available on the James E. Walker Library’s website. This Guide includes videos and transcripts providing advanced instruction for creating ePortfolios. Here are links to a few of the most common questions:
- Uploading artifacts to the Dashboard
- Creating your ePortfolio
- Adding pages to your ePortfolio
- Adding artifacts to particular pages of your ePortfolio
- Resizing photos
- Adding a customized banner image
- Sharing your ePortfolio
- Submitting your ePortfolio through Dropbox
Visit the Writing Center for more help on your writing project! Stop by LIB 362 or visit us online at mtsu.mywconline.com to schedule an appointment.
Office Phone
(615) 904-8237
Location
Walker Library, Room 362
Address:
Read about our 45th Anniversary event and take a look at our growing digital archive!
Check out the latest issue of Off Center Magazine!
![]()
![]()
![]()

